The Original Document Was Reused. Read It Again From File
PDF and Word documents are binary files, which makes them much more complex than plaintext files. In improver to text, they shop lots of font, color, and layout information. If you want your programs to read or write to PDFs or Word documents, you lot'll need to do more than than simply pass their filenames to open().
Fortunately, in that location are Python modules that brand it easy for you to interact with PDFs and Word documents. This chapter will encompass two such modules: PyPDF2 and Python-Docx.
PDF Documents
PDF stands for Portable Document Format and uses the .pdf file extension. Although PDFs support many features, this affiliate will focus on the 2 things you'll be doing almost often with them: reading text content from PDFs and crafting new PDFs from existing documents.
The module you'll use to work with PDFs is PyPDF2. To install information technology, run pip install PyPDF2 from the command line. This module name is case sensitive, so make certain the y is lowercase and everything else is uppercase. (Cheque out Appendix A for full details most installing third-party modules.) If the module was installed correctly, running import PyPDF2 in the interactive shell shouldn't display whatsoever errors.
Extracting Text from PDFs
PyPDF2 does not have a mode to excerpt images, charts, or other media from PDF documents, but it can extract text and render information technology as a Python string. To start learning how PyPDF2 works, we'll use it on the example PDF shown in Figure 13-1.
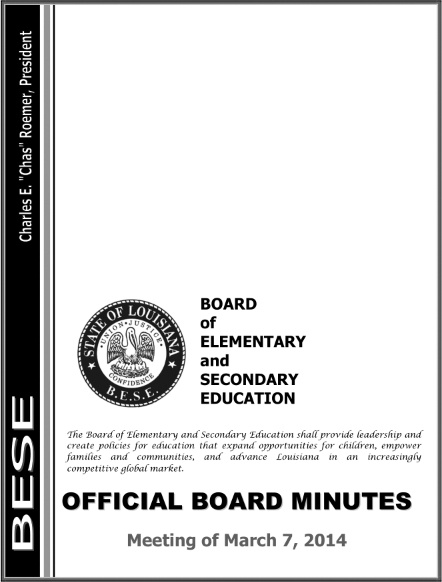
Figure thirteen-ane. The PDF folio that nosotros will exist extracting text from
Download this PDF from http://nostarch.com/automatestuff/ , and enter the following into the interactive shell:
>>> import PyPDF2 >>> pdfFileObj = open('meetingminutes.pdf', 'rb') >>> pdfReader = PyPDF2.PdfFileReader(pdfFileObj) ❶ >>> pdfReader.numPages 19 ❷ >>> pageObj = pdfReader.getPage(0) ❸ >>> pageObj.extractText() 'OOFFFFIICCIIAALL BBOOAARRDD MMIINNUUTTEESS Meeting of March 7, 2015 \n The Board of Elementary and Secondary Teaching shall provide leadership and create policies for teaching that expand opportunities for children, empower families and communities, and advance Louisiana in an increasingly competitive global market. Lath of Unproblematic and SECONDARY EDUCATION '
Kickoff, import the PyPDF2 module. Then open meetingminutes.pdf in read binary mode and store information technology in pdfFileObj. To get a PdfFileReader object that represents this PDF, telephone call PyPDF2.PdfFileReader() and laissez passer it pdfFileObj. Shop this PdfFileReader object in pdfReader.
The total number of pages in the document is stored in the numPages aspect of a PdfFileReader object ❶. The example PDF has 19 pages, but permit's extract text from just the first page.
To extract text from a page, you need to get a Folio object, which represents a unmarried folio of a PDF, from a PdfFileReader object. You can get a Page object by calling the getPage() method ❷ on a PdfFileReader object and passing it the page number of the page you're interested in—in our case, 0.
PyPDF2 uses a zilch-based index for getting pages: The kickoff page is page 0, the second is Introduction, and then on. This is e'er the case, even if pages are numbered differently within the document. For example, say your PDF is a three-page extract from a longer report, and its pages are numbered 42, 43, and 44. To get the outset page of this certificate, you would want to call pdfReader.getPage(0), not getPage(42) or getPage(1).
Once you accept your Page object, call its extractText() method to return a string of the page'south text ❸. The text extraction isn't perfect: The text Charles East. "Chas" Roemer, President from the PDF is absent from the string returned by extractText(), and the spacing is sometimes off. Still, this approximation of the PDF text content may be good enough for your program.
Decrypting PDFs
Some PDF documents have an encryption feature that will go on them from being read until whoever is opening the document provides a password. Enter the following into the interactive shell with the PDF you downloaded, which has been encrypted with the password rosebud :
>>> import PyPDF2 >>> pdfReader = PyPDF2.PdfFileReader(open('encrypted.pdf', 'rb')) ❶ >>> pdfReader.isEncrypted True >>> pdfReader.getPage(0) ❷ Traceback (virtually contempo call last): File "<pyshell#173>", line 1, in <module> pdfReader.getPage() --snip-- File "C:\Python34\lib\site-packages\PyPDF2\pdf.py", line 1173, in getObject raise utils.PdfReadError("file has not been decrypted") PyPDF2.utils.PdfReadError: file has not been decrypted ❸ >>> pdfReader.decrypt('rosebud') 1 >>> pageObj = pdfReader.getPage(0)
All PdfFileReader objects take an isEncrypted aspect that is True if the PDF is encrypted and False if it isn't ❶. Any effort to call a function that reads the file before it has been decrypted with the correct password will result in an error ❷.
To read an encrypted PDF, telephone call the decrypt() function and laissez passer the password equally a string ❸. After yous phone call decrypt() with the correct password, you lot'll encounter that calling getPage() no longer causes an error. If given the wrong password, the decrypt() role will render 0 and getPage() will continue to fail. Annotation that the decrypt() method decrypts simply the PdfFileReader object, not the actual PDF file. Afterward your program terminates, the file on your difficult drive remains encrypted. Your program will have to call decrypt() once again the side by side time it is run.
Creating PDFs
PyPDF2'southward counterpart to PdfFileReader objects is PdfFileWriter objects, which tin create new PDF files. Merely PyPDF2 cannot write arbitrary text to a PDF like Python tin can do with plaintext files. Instead, PyPDF2's PDF-writing capabilities are limited to copying pages from other PDFs, rotating pages, overlaying pages, and encrypting files.
PyPDF2 doesn't allow yous to directly edit a PDF. Instead, you have to create a new PDF and then copy content over from an existing document. The examples in this section volition follow this general approach:
-
Open one or more existing PDFs (the source PDFs) into
PdfFileReaderobjects. -
Create a new
PdfFileWriterobject. -
Copy pages from the
PdfFileReaderobjects into thePdfFileWriterobject. -
Finally, use the
PdfFileWriterobject to write the output PDF.
Creating a PdfFileWriter object creates simply a value that represents a PDF document in Python. It doesn't create the actual PDF file. For that, yous must telephone call the PdfFileWriter's write() method.
The write() method takes a regular File object that has been opened in write-binary mode. You can get such a File object by calling Python's open() function with two arguments: the cord of what y'all want the PDF's filename to be and 'wb' to signal the file should be opened in write-binary mode.
If this sounds a piddling disruptive, don't worry—you'll see how this works in the following lawmaking examples.
Copying Pages
You lot can use PyPDF2 to re-create pages from one PDF certificate to some other. This allows you to combine multiple PDF files, cut unwanted pages, or reorder pages.
Download meetingminutes.pdf and meetingminutes2.pdf from http://nostarch.com/automatestuff/ and identify the PDFs in the current working directory. Enter the following into the interactive shell:
>>> import PyPDF2 >>> pdf1File = open('meetingminutes.pdf', 'rb') >>> pdf2File = open('meetingminutes2.pdf', 'rb') ❶ >>> pdf1Reader = PyPDF2.PdfFileReader(pdf1File) ❷ >>> pdf2Reader = PyPDF2.PdfFileReader(pdf2File) ❸ >>> pdfWriter = PyPDF2.PdfFileWriter() >>> for pageNum in range(pdf1Reader.numPages): ❹ pageObj = pdf1Reader.getPage(pageNum) ❺ pdfWriter.addPage(pageObj) >>> for pageNum in range(pdf2Reader.numPages): ❻ pageObj = pdf2Reader.getPage(pageNum) ❼ pdfWriter.addPage(pageObj) ❽ >>> pdfOutputFile = open('combinedminutes.pdf', 'wb') >>> pdfWriter.write(pdfOutputFile) >>> pdfOutputFile.shut() >>> pdf1File.shut() >>> pdf2File.close()
Open up both PDF files in read binary mode and store the two resulting File objects in pdf1File and pdf2File. Call PyPDF2.PdfFileReader() and pass information technology pdf1File to get a PdfFileReader object for meetingminutes.pdf ❶. Call it again and laissez passer it pdf2File to become a PdfFileReader object for meetingminutes2.pdf ❷. And then create a new PdfFileWriter object, which represents a bare PDF document ❸.
Next, copy all the pages from the two source PDFs and add them to the PdfFileWriter object. Get the Folio object by calling getPage() on a PdfFileReader object ❹. Then laissez passer that Page object to your PdfFileWriter's addPage() method ❺. These steps are done first for pdf1Reader then once again for pdf2Reader. When you're done copying pages, write a new PDF called combinedminutes.pdf by passing a File object to the PdfFileWriter's write() method ❻.
Note
PyPDF2 cannot insert pages in the eye of a PdfFileWriter object; the addPage() method volition only add together pages to the end.
You lot have now created a new PDF file that combines the pages from meetingminutes.pdf and meetingminutes2.pdf into a single document. Remember that the File object passed to PyPDF2.PdfFileReader() needs to exist opened in read-binary style by passing 'rb' as the second statement to open(). Likewise, the File object passed to PyPDF2.PdfFileWriter() needs to be opened in write-binary mode with 'wb'.
Rotating Pages
The pages of a PDF tin can also be rotated in 90-caste increments with the rotateClockwise() and rotateCounterClockwise() methods. Pass i of the integers 90, 180, or 270 to these methods. Enter the post-obit into the interactive vanquish, with the meetingminutes.pdf file in the current working directory:
>>> import PyPDF2 >>> minutesFile = open('meetingminutes.pdf', 'rb') >>> pdfReader = PyPDF2.PdfFileReader(minutesFile) ❶ >>> page = pdfReader.getPage(0) ❷ >>> folio.rotateClockwise(ninety) {'/Contents': [IndirectObject(961, 0), IndirectObject(962, 0), --snip-- } >>> pdfWriter = PyPDF2.PdfFileWriter() >>> pdfWriter.addPage(page) ❸ >>> resultPdfFile = open up('rotatedPage.pdf', 'wb') >>> pdfWriter.write(resultPdfFile) >>> resultPdfFile.shut() >>> minutesFile.close()
Hither we utilise getPage(0) to select the first page of the PDF ❶, and then nosotros telephone call rotateClockwise(90) on that page ❷. Nosotros write a new PDF with the rotated page and salvage it equally rotatedPage.pdf ❸.
The resulting PDF will have one page, rotated 90 degrees clockwise, as in Figure 13-2. The return values from rotateClockwise() and rotateCounterClockwise() contain a lot of information that yous can ignore.
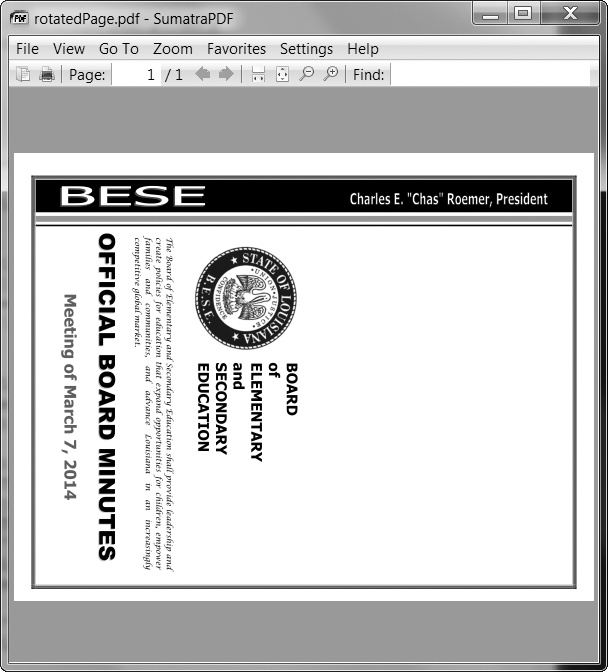
Figure 13-2. The rotatedPage.pdf file with the page rotated 90 degrees clockwise
Overlaying Pages
PyPDF2 tin can too overlay the contents of i page over another, which is useful for adding a logo, timestamp, or watermark to a folio. With Python, it's easy to add together watermarks to multiple files and only to pages your program specifies.
Download watermark.pdf from http://nostarch.com/automatestuff/ and identify the PDF in the current working directory along with meetingminutes.pdf . And then enter the following into the interactive shell:
>>> import PyPDF2 >>> minutesFile = open('meetingminutes.pdf', 'rb') ❷ >>> pdfReader = PyPDF2.PdfFileReader(minutesFile) ❷ >>> minutesFirstPage = pdfReader.getPage(0) ❸ >>> pdfWatermarkReader = PyPDF2.PdfFileReader(open up('watermark.pdf', 'rb')) ❹ >>> minutesFirstPage.mergePage(pdfWatermarkReader.getPage(0)) ❺ >>> pdfWriter = PyPDF2.PdfFileWriter() ❻ >>> pdfWriter.addPage(minutesFirstPage) ❼ >>> for pageNum in range(one, pdfReader.numPages): pageObj = pdfReader.getPage(pageNum) pdfWriter.addPage(pageObj) >>> resultPdfFile = open('watermarkedCover.pdf', 'wb') >>> pdfWriter.write(resultPdfFile) >>> minutesFile.close() >>> resultPdfFile.close() Here nosotros brand a PdfFileReader object of meetingminutes.pdf ❶. We telephone call getPage(0) to get a Folio object for the first page and store this object in minutesFirstPage ❷. We then make a PdfFileReader object for watermark.pdf ❸ and call mergePage() on minutesFirstPage ❹. The argument we pass to mergePage() is a Page object for the first page of watermark.pdf .
Now that nosotros've called mergePage() on minutesFirstPage, minutesFirstPage represents the watermarked kickoff folio. We make a PdfFileWriter object ❺ and add the watermarked kickoff page ❻. Then we loop through the balance of the pages in meetingminutes.pdf and add them to the PdfFileWriter object ❼. Finally, we open a new PDF chosen watermarkedCover.pdf and write the contents of the PdfFileWriter to the new PDF.
Effigy 13-3 shows the results. Our new PDF, watermarkedCover.pdf , has all the contents of the meetingminutes.pdf , and the first page is watermarked.
Effigy 13-iii. The original PDF (left), the watermark PDF (center), and the merged PDF (right)
Encrypting PDFs
A PdfFileWriter object tin also add encryption to a PDF certificate. Enter the post-obit into the interactive shell:
>>> import PyPDF2 >>> pdfFile = open('meetingminutes.pdf', 'rb') >>> pdfReader = PyPDF2.PdfFileReader(pdfFile) >>> pdfWriter = PyPDF2.PdfFileWriter() >>> for pageNum in range(pdfReader.numPages): pdfWriter.addPage(pdfReader.getPage(pageNum)) ❶ >>> pdfWriter.encrypt('swordfish') >>> resultPdf = open up('encryptedminutes.pdf', 'wb') >>> pdfWriter.write(resultPdf) >>> resultPdf.close()
Before calling the write() method to save to a file, call the encrypt() method and laissez passer it a countersign string ❶. PDFs tin have a user password (assuasive you to view the PDF) and an possessor countersign (allowing you to set permissions for press, commenting, extracting text, and other features). The user password and owner password are the first and second arguments to encrypt(), respectively. If only i string argument is passed to encrypt(), it will be used for both passwords.
In this case, we copied the pages of meetingminutes.pdf to a PdfFileWriter object. We encrypted the PdfFileWriter with the password swordfish , opened a new PDF called encryptedminutes.pdf , and wrote the contents of the PdfFileWriter to the new PDF. Before anyone can view encryptedminutes.pdf , they'll have to enter this password. You lot may want to delete the original, unencrypted meetingminutes.pdf file after ensuring its copy was correctly encrypted.
Project: Combining Select Pages from Many PDFs
Say you lot have the boring job of merging several dozen PDF documents into a single PDF file. Each of them has a embrace sheet as the starting time page, just you don't want the comprehend sail repeated in the final result. Even though there are lots of costless programs for combining PDFs, many of them simply merge entire files together. Allow's write a Python program to customize which pages yous desire in the combined PDF.
At a high level, here's what the program volition do:
-
Detect all PDF files in the current working directory.
-
Sort the filenames so the PDFs are added in order.
-
Write each folio, excluding the first page, of each PDF to the output file.
In terms of implementation, your code volition demand to do the following:
-
Call
bone.listdir()to find all the files in the working directory and remove any not-PDF files. -
Phone call Python's
sort()list method to alphabetize the filenames. -
Create a
PdfFileWriterobject for the output PDF. -
Loop over each PDF file, creating a
PdfFileReaderobject for information technology. -
Loop over each page (except the starting time) in each PDF file.
-
Add the pages to the output PDF.
-
Write the output PDF to a file named allminutes.pdf .
For this project, open up a new file editor window and salve information technology as combinePdfs.py .
Footstep 1: Detect All PDF Files
Showtime, your program needs to get a list of all files with the .pdf extension in the current working directory and sort them. Brand your lawmaking look similar the post-obit:
#! python3 # combinePdfs.py - Combines all the PDFs in the current working directory into # into a single PDF. ❶ import PyPDF2, os # Get all the PDF filenames. pdfFiles = [] for filename in os.listdir('.'): if filename.endswith('.pdf'): ❷ pdfFiles.append(filename) ❸ pdfFiles.sort(key=str.lower) ❹ pdfWriter = PyPDF2.PdfFileWriter() # TODO: Loop through all the PDF files. # TODO: Loop through all the pages (except the offset) and add together them. # TODO: Save the resulting PDF to a file. Later on the shebang line and the descriptive comment about what the program does, this code imports the os and PyPDF2 modules ❶. The os.listdir('.') call will return a listing of every file in the current working directory. The code loops over this listing and adds only those files with the .pdf extension to pdfFiles ❷. Afterward, this list is sorted in alphabetical guild with the key=str.lower keyword argument to sort() ❸.
A PdfFileWriter object is created to concur the combined PDF pages ❹. Finally, a few comments outline the residual of the program.
Step two: Open Each PDF
Now the program must read each PDF file in pdfFiles. Add the following to your program:
#! python3 # combinePdfs.py - Combines all the PDFs in the current working directory into # a single PDF. import PyPDF2, os # Get all the PDF filenames. pdfFiles = [] --snip-- # Loop through all the PDF files. for filename in pdfFiles: pdfFileObj = open(filename, 'rb') pdfReader = PyPDF2.PdfFileReader(pdfFileObj) # TODO: Loop through all the pages (except the first) and add them. # TODO: Save the resulting PDF to a file.
For each PDF, the loop opens a filename in read-binary mode by calling open() with 'rb' equally the 2nd statement. The open() call returns a File object, which gets passed to PyPDF2.PdfFileReader() to create a PdfFileReader object for that PDF file.
Step 3: Add Each Page
For each PDF, you'll desire to loop over every page except the first. Add this code to your plan:
#! python3 # combinePdfs.py - Combines all the PDFs in the electric current working directory into # a single PDF. import PyPDF2, os --snip-- # Loop through all the PDF files. for filename in pdfFiles: --snip-- # Loop through all the pages (except the kickoff) and add together them. ❶ for pageNum in range(1, pdfReader.numPages): pageObj = pdfReader.getPage(pageNum) pdfWriter.addPage(pageObj) # TODO: Relieve the resulting PDF to a file.
The code inside the for loop copies each Page object individually to the PdfFileWriter object. Remember, you want to skip the first page. Since PyPDF2 considers 0 to be the kickoff folio, your loop should start at 1 ❶ so go upwardly to, simply not include, the integer in pdfReader.numPages.
Footstep 4: Save the Results
After these nested for loops are done looping, the pdfWriter variable volition contain a PdfFileWriter object with the pages for all the PDFs combined. The last step is to write this content to a file on the hard drive. Add this code to your programme:
#! python3 # combinePdfs.py - Combines all the PDFs in the current working directory into # a single PDF. import PyPDF2, os --snip-- # Loop through all the PDF files. for filename in pdfFiles: --snip-- # Loop through all the pages (except the outset) and add them. for pageNum in range(1, pdfReader.numPages): --snip-- # Salve the resulting PDF to a file. pdfOutput = open('allminutes.pdf', 'wb') pdfWriter.write(pdfOutput) pdfOutput.close()
Passing 'wb' to open() opens the output PDF file, allminutes.pdf , in write-binary mode. Then, passing the resulting File object to the write() method creates the actual PDF file. A call to the close() method finishes the program.
Ideas for Similar Programs
Being able to create PDFs from the pages of other PDFs volition let you lot make programs that can do the following:
-
Cut out specific pages from PDFs.
-
Reorder pages in a PDF.
-
Create a PDF from only those pages that have some specific text, identified by
extractText().
Word Documents
Python can create and change Word documents, which have the .docx file extension, with the python-docx module. You tin install the module by running pip install python-docx. (Appendix A has full details on installing third-political party modules.)
Note
When using pip to outset install Python-Docx, exist certain to install python-docx, non docx. The installation name docx is for a dissimilar module that this book does non cover. However, when y'all are going to import the python-docx module, you'll demand to run import docx, not import python-docx.
If you don't accept Word, LibreOffice Writer and OpenOffice Author are both gratis culling applications for Windows, OS Ten, and Linux that tin can be used to open up .docx files. Y'all can download them from https://www.libreoffice.org and http://openoffice.org , respectively. The total documentation for Python-Docx is available at https://python-docx.readthedocs.org/ . Although there is a version of Word for OS X, this chapter will focus on Word for Windows.
Compared to plaintext, .docx files accept a lot of construction. This structure is represented by three unlike data types in Python-Docx. At the highest level, a Certificate object represents the entire document. The Document object contains a listing of Paragraph objects for the paragraphs in the document. (A new paragraph begins whenever the user presses ENTER or Return while typing in a Word document.) Each of these Paragraph objects contains a list of one or more Run objects. The single-sentence paragraph in Figure 13-4 has 4 runs.

Figure 13-4. The Run objects identified in a Paragraph object
The text in a Word document is more than just a string. Information technology has font, size, color, and other styling information associated with it. A style in Word is a collection of these attributes. A Run object is a contiguous run of text with the same style. A new Run object is needed whenever the text style changes.
Reading Word Documents
Let's experiment with the python-docx module. Download demo.docx from http://nostarch.com/automatestuff/ and save the document to the working directory. Then enter the following into the interactive shell:
>>> import docx ❶ >>> medico = docx.Document('demo.docx') ❷ >>> len(doc.paragraphs) seven ❸ >>> medico.paragraphs[0].text 'Document Title' ❹ >>> physician.paragraphs[1].text 'A plain paragraph with some bold and some italic' ❺ >>> len(physician.paragraphs[1].runs) 4 ❻ >>> doc.paragraphs[ane].runs[0].text 'A plainly paragraph with some ' ❼ >>> doc.paragraphs[i].runs[1].text 'assuming' ❽ >>> doc.paragraphs[1].runs[2].text ' and some ' ➒ >>> doc.paragraphs[1].runs[three].text 'italic'
At ❶, we open a .docx file in Python, call docx.Document(), and pass the filename demo.docx . This will return a Document object, which has a paragraphs attribute that is a list of Paragraph objects. When we call len() on doctor.paragraphs, it returns vii, which tells us that there are seven Paragraph objects in this document ❷. Each of these Paragraph objects has a text attribute that contains a string of the text in that paragraph (without the mode information). Hither, the first text attribute contains 'DocumentTitle' ❸, and the second contains 'A apparently paragraph with some assuming and some italic' ❹.
Each Paragraph object also has a runs attribute that is a listing of Run objects. Run objects also have a text attribute, containing just the text in that particular run. Permit's await at the text attributes in the second Paragraph object, 'A plain paragraph with some bold and some italic'. Calling len() on this Paragraph object tells us that in that location are four Run objects ❺. The first run object contains 'A plain paragraph with some ' ❻. Then, the text change to a assuming style, and so 'bold' starts a new Run object ❼. The text returns to an unbolded manner after that, which results in a third Run object, ' and some ' ❽. Finally, the quaternary and terminal Run object contains 'italic' in an italic style ➒.
With Python-Docx, your Python programs will now be able to read the text from a .docx file and employ it just like whatsoever other string value.
Getting the Full Text from a .docx File
If you care merely about the text, not the styling information, in the Word document, you can utilise the getText() part. Information technology accepts a filename of a .docx file and returns a single cord value of its text. Open a new file editor window and enter the post-obit code, saving it as readDocx.py :
#! python3 import docx def getText(filename): doc = docx.Document(filename) fullText = [] for para in doc.paragraphs: fullText.append(para.text) return '\n'.join(fullText)
The getText() function opens the Discussion certificate, loops over all the Paragraph objects in the paragraphs list, then appends their text to the listing in fullText. Later the loop, the strings in fullText are joined together with newline characters.
The readDocx.py program tin can be imported like whatsoever other module. Now if y'all merely need the text from a Word document, you can enter the following:
>>> import readDocx >>> impress(readDocx.getText('demo.docx')) Document Title A plain paragraph with some bold and some italic Heading, level 1 Intense quote beginning item in unordered list first item in ordered list
Y'all can also adapt getText() to modify the string before returning it. For case, to indent each paragraph, replace the append() call in readDocx.py with this:
fullText.append( ' ' + para.text) To add a double space in between paragraphs, change the join() phone call code to this:
return '\n \northward '.join(fullText) As you can run across, it takes only a few lines of code to write functions that volition read a .docx file and return a cord of its content to your liking.
Styling Paragraph and Run Objects
In Word for Windows, y'all can come across the styles by pressing CTRL-ALT-SHIFT-S to brandish the Styles pane, which looks similar Figure 13-five. On Bone X, you can view the Styles pane by clicking the View ▸ Styles menu item.
Effigy thirteen-5. Brandish the Styles pane past pressing CTRL-ALT-SHIFT-S on Windows.
Discussion and other word processors use styles to keep the visual presentation of similar types of text consequent and piece of cake to change. For instance, mayhap you want to set body paragraphs in 11-bespeak, Times New Roman, left-justified, ragged-right text. You can create a manner with these settings and assign it to all torso paragraphs. Then, if you afterward desire to change the presentation of all trunk paragraphs in the certificate, you tin just change the manner, and all those paragraphs volition be automatically updated.
For Word documents, there are three types of styles: Paragraph styles can be applied to Paragraph objects, character styles tin can be applied to Run objects, and linked styles can be applied to both kinds of objects. You can give both Paragraph and Run objects styles by setting their style attribute to a string. This string should be the proper noun of a manner. If manner is set to None, then in that location will be no style associated with the Paragraph or Run object.
The string values for the default Discussion styles are as follows:
| | | | |
| | | | |
| | | | |
| | | | |
| | | | |
| | | | |
| | | | |
| | | | |
| | | |
When setting the fashion attribute, practise not use spaces in the style proper noun. For example, while the style proper noun may be Subtle Emphasis, you should fix the mode attribute to the cord value 'SubtleEmphasis' instead of 'Subtle Emphasis'. Including spaces volition cause Word to misread the style name and not apply it.
When using a linked style for a Run object, yous will need to add 'Char' to the terminate of its proper name. For case, to set up the Quote linked manner for a Paragraph object, you would use paragraphObj.style = 'Quote', but for a Run object, you would use runObj.style = 'QuoteChar'.
In the current version of Python-Docx (0.7.4), the only styles that tin can be used are the default Word styles and the styles in the opened .docx . New styles cannot be created—though this may modify in future versions of Python-Docx.
Creating Discussion Documents with Nondefault Styles
If you want to create Give-and-take documents that use styles beyond the default ones, you volition need to open Discussion to a blank Word document and create the styles yourself by clicking the New Style button at the bottom of the Styles pane (Figure xiii-half dozen shows this on Windows).
This will open the Create New Style from Formatting dialog, where you can enter the new style. Then, get back into the interactive shell and open this blank Give-and-take certificate with docx.Document(), using information technology as the base for your Word document. The name yous gave this way will now exist available to utilise with Python-Docx.
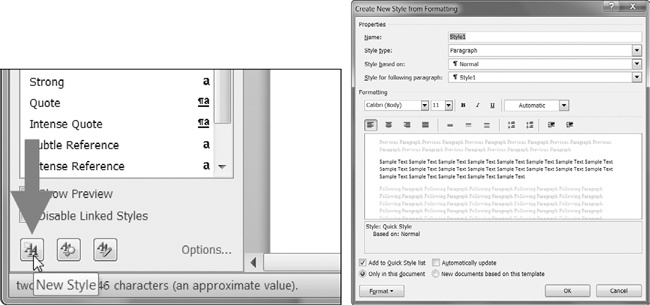
Figure thirteen-6. The New Style button (left) and the Create New Fashion from Formatting dialog (right)
Run Attributes
Runs tin can exist further styled using text attributes. Each aspect can be set up to 1 of 3 values: True (the attribute is always enabled, no matter what other styles are practical to the run), False (the aspect is ever disabled), or None (defaults to whatever the run'due south style is ready to).
Tabular array 13-i lists the text attributes that tin can be set on Run objects.
Table 13-1.Run Object text Attributes
| Attribute | Description |
|---|---|
| | The text appears in bold. |
| | The text appears in italic. |
| | The text is underlined. |
| | The text appears with strikethrough. |
| | The text appears with double strikethrough. |
| | The text appears in uppercase letters. |
| | The text appears in capital letters, with lowercase letters two points smaller. |
| | The text appears with a shadow. |
| | The text appears outlined rather than solid. |
| | The text is written right-to-left. |
| | The text appears pressed into the folio. |
| | The text appears raised off the page in relief. |
For example, to change the styles of demo.docx , enter the following into the interactive shell:
>>> physician = docx.Document('demo.docx') >>> md.paragraphs[0].text 'Certificate Title' >>> physician.paragraphs[0].mode 'Title' >>> doc.paragraphs[0].fashion = 'Normal' >>> doc.paragraphs[1].text 'A plain paragraph with some bold and some italic' >>> (physician.paragraphs[1].runs[0].text, doc.paragraphs[ane].runs[1].text, doctor. paragraphs[1].runs[2].text, doc.paragraphs[one].runs[three].text) ('A plain paragraph with some ', 'bold', ' and some ', 'italic') >>> doc.paragraphs[ane].runs[0].style = 'QuoteChar' >>> doc.paragraphs[1].runs[i].underline = True >>> doc.paragraphs[1].runs[3].underline = Truthful >>> physician.salve('restyled.docx')
Here, we use the text and fashion attributes to hands see what's in the paragraphs in our document. We can see that it's simple to split a paragraph into runs and access each run individiaully. So we get the first, second, and fourth runs in the second paragraph, style each run, and salvage the results to a new document.
The words Document Championship at the tiptop of restyled.docx will have the Normal manner instead of the Title style, the Run object for the text A evidently paragraph with some will take the QuoteChar style, and the two Run objects for the words bold and italic will have their underline attributes set to True. Figure 13-seven shows how the styles of paragraphs and runs look in restyled.docx .

Effigy 13-7. The restyled.docx file
You can observe more consummate documentation on Python-Docx's employ of styles at https://python-docx.readthedocs.org/en/latest/user/styles.html .
Writing Word Documents
Enter the following into the interactive shell:
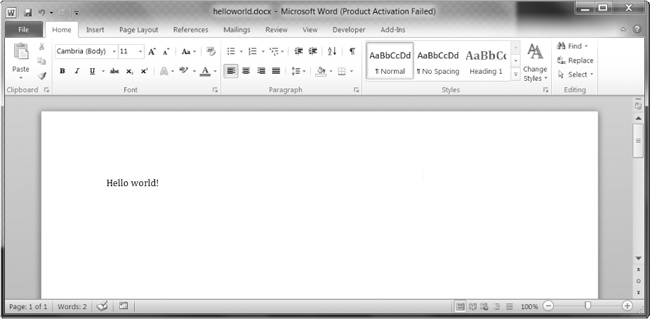
>>> import docx >>> doc = docx.Document() >>> doc.add_paragraph('Howdy world!') <docx.text.Paragraph object at 0x0000000003B56F60> >>> medico.save('helloworld.docx')
To create your own .docx file, call docx.Document() to render a new, blank Word Document object. The add_paragraph() document method adds a new paragraph of text to the document and returns a reference to the Paragraph object that was added. When you're done adding text, pass a filename string to the save() document method to save the Document object to a file.
This will create a file named helloworld.docx in the current working directory that, when opened, looks like Figure xiii-eight.
Effigy 13-8. The Word document created using add_paragraph('Hi world!')
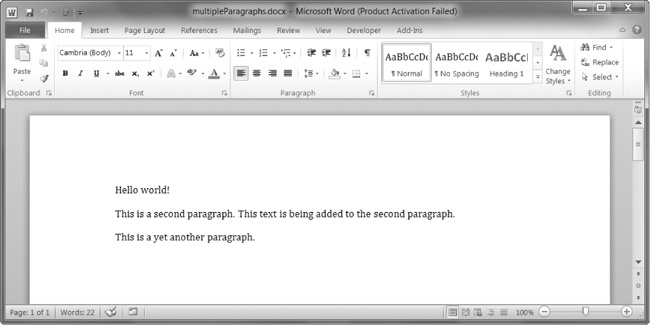
Yous can add paragraphs past calling the add_paragraph() method again with the new paragraph's text. Or to add text to the stop of an existing paragraph, yous can call the paragraph'due south add_run() method and laissez passer it a cord. Enter the post-obit into the interactive shell:
>>> import docx >>> md = docx.Certificate() >>> doc.add_paragraph('Hello world!') <docx.text.Paragraph object at 0x000000000366AD30> >>> paraObj1 = doc.add_paragraph('This is a second paragraph.') >>> paraObj2 = medico.add_paragraph('This is a notwithstanding another paragraph.') >>> paraObj1.add_run(' This text is being added to the 2d paragraph.') <docx.text.Run object at 0x0000000003A2C860> >>> doc.save('multipleParagraphs.docx')
The resulting certificate will look like Figure 13-9. Note that the text This text is being added to the 2d paragraph. was added to the Paragraph object in paraObj1, which was the second paragraph added to doc. The add_paragraph() and add_run() functions render paragraph and Run objects, respectively, to save you the problem of extracting them as a separate footstep.
Keep in listen that as of Python-Docx version 0.5.3, new Paragraph objects can exist added merely to the end of the certificate, and new Run objects tin can be added only to the end of a Paragraph object.
The save() method can be called again to relieve the boosted changes you've made.
Effigy xiii-nine. The document with multiple Paragraph and Run objects added
Both add_paragraph() and add_run() have an optional second argument that is a cord of the Paragraph or Run object's style. For instance:
>>> doc.add_paragraph('Hello world!', 'Title') This line adds a paragraph with the text Hello world! in the Title way.
Adding Headings
Calling add_heading() adds a paragraph with 1 of the heading styles. Enter the following into the interactive vanquish:
>>> doc = docx.Document() >>> doc.add_heading('Header 0', 0) <docx.text.Paragraph object at 0x00000000036CB3C8> >>> doc.add_heading('Header 1', one) <docx.text.Paragraph object at 0x00000000036CB630> >>> doc.add_heading('Header ii', ii) <docx.text.Paragraph object at 0x00000000036CB828> >>> physician.add_heading('Header 3', 3) <docx.text.Paragraph object at 0x00000000036CB2E8> >>> doc.add_heading('Header four', iv) <docx.text.Paragraph object at 0x00000000036CB3C8> >>> md.relieve('headings.docx')
The arguments to add_heading() are a string of the heading text and an integer from 0 to 4. The integer 0 makes the heading the Title style, which is used for the meridian of the certificate. Integers 1 to 4 are for diverse heading levels, with 1 beingness the chief heading and 4 the everyman subheading. The add_heading() role returns a Paragraph object to save y'all the step of extracting it from the Certificate object equally a separate step.
The resulting headings.docx file will expect similar Figure 13-ten.
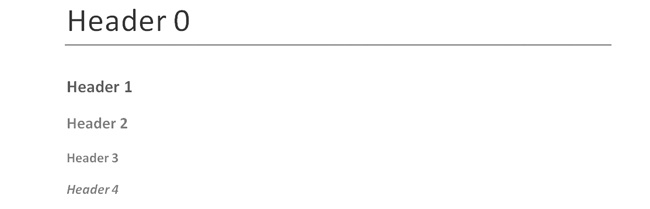
Figure 13-10. The headings.docx certificate with headings 0 to 4
Adding Line and Page Breaks
To add together a line interruption (rather than starting a whole new paragraph), y'all tin can call the add_break() method on the Run object yous want to have the break appear after. If you want to add a page break instead, you need to pass the value docx.text.WD_BREAK.PAGE equally a lonely argument to add_break(), as is done in the centre of the post-obit instance:
>>> doc = docx.Certificate() >>> physician.add_paragraph('This is on the first page!') <docx.text.Paragraph object at 0x0000000003785518> ❶ >>> doc.paragraphs[0].runs[0].add_break(docx.text.WD_BREAK.PAGE) >>> doctor.add_paragraph('This is on the second folio!') <docx.text.Paragraph object at 0x00000000037855F8> >>> doc.relieve('twoPage.docx')
This creates a two-page Word certificate with This is on the offset page! on the outset folio and This is on the 2nd folio! on the second. Even though there was still plenty of space on the beginning page after the text This is on the first page! , nosotros forced the next paragraph to begin on a new page past inserting a folio pause after the starting time run of the kickoff paragraph ❶.
Adding Pictures
Certificate objects accept an add_picture() method that will let you add together an image to the end of the certificate. Say you have a file zophie.png in the current working directory. You can add zophie.png to the end of your document with a width of one inch and height of iv centimeters (Word can utilise both purple and metric units) by entering the post-obit:
>>> doc.add_picture('zophie.png', width=docx.shared.Inches(1), height=docx.shared.Cm(4)) <docx.shape.InlineShape object at 0x00000000036C7D30>
The first argument is a string of the image's filename. The optional width and pinnacle keyword arguments will set the width and height of the image in the certificate. If left out, the width and height volition default to the normal size of the image.
You'll probably prefer to specify an prototype's summit and width in familiar units such as inches and centimeters, so yous can apply the docx.shared.Inches() and docx.shared.Cm() functions when you're specifying the width and height keyword arguments.
Summary
Text information isn't just for plaintext files; in fact, it's pretty probable that you deal with PDFs and Word documents much more than frequently. You can utilise the PyPDF2 module to read and write PDF documents. Unfortunately, reading text from PDF documents might non always result in a perfect translation to a string because of the complicated PDF file format, and some PDFs might not be readable at all. In these cases, you're out of luck unless time to come updates to PyPDF2 back up additional PDF features.
Word documents are more reliable, and y'all tin read them with the python-docx module. Yous can manipulate text in Word documents via Paragraph and Run objects. These objects can likewise be given styles, though they must be from the default prepare of styles or styles already in the document. You tin can add new paragraphs, headings, breaks, and pictures to the document, though only to the finish.
Many of the limitations that come with working with PDFs and Word documents are considering these formats are meant to be nicely displayed for man readers, rather than easy to parse by software. The next chapter takes a await at two other common formats for storing information: JSON and CSV files. These formats are designed to be used by computers, and you'll see that Python can work with these formats much more easily.
Exercise Questions
| Q: | 1. A string value of the PDF filename is not passed to the |
| Q: | 2. What modes do the |
| Q: | three. How do you learn a |
| Q: | 4. What |
| Q: | 5. If a |
| Q: | 6. What methods practise you use to rotate a page? |
| Q: | seven. What method returns a |
| Q: | viii. What is the difference between a |
| Q: | ix. How exercise you obtain a list of |
| Q: | 10. What blazon of object has |
| Q: | eleven. What is the difference betwixt setting the |
| Q: | 12. How do y'all create a |
| Q: | 13. How do you add a paragraph with the text |
| Q: | 14. What integers stand for the levels of headings bachelor in Word documents? |
Exercise Projects
For practise, write programs that do the following.
PDF Paranoia
Using the os.walk() function from Chapter 9, write a script that will get through every PDF in a folder (and its subfolders) and encrypt the PDFs using a password provided on the control line. Save each encrypted PDF with an _encrypted.pdf suffix added to the original filename. Earlier deleting the original file, take the program attempt to read and decrypt the file to ensure that information technology was encrypted correctly.
And then, write a program that finds all encrypted PDFs in a folder (and its subfolders) and creates a decrypted copy of the PDF using a provided password. If the password is wrong, the program should print a bulletin to the user and continue to the adjacent PDF.
Custom Invitations every bit Word Documents
Say you lot have a text file of guest names. This guests.txt file has 1 name per line, as follows:
Prof. Plum Miss Scarlet Col. Mustard Al Sweigart Robocop
Write a program that would generate a Word document with custom invitations that look like Figure 13-11.
Since Python-Docx tin can use merely those styles that already exist in the Word document, you will have to first add these styles to a blank Word file and so open up that file with Python-Docx. There should be one invitation per page in the resulting Word certificate, so phone call add_break() to add a page break after the last paragraph of each invitation. This style, y'all will need to open only one Give-and-take document to print all of the invitations at once.
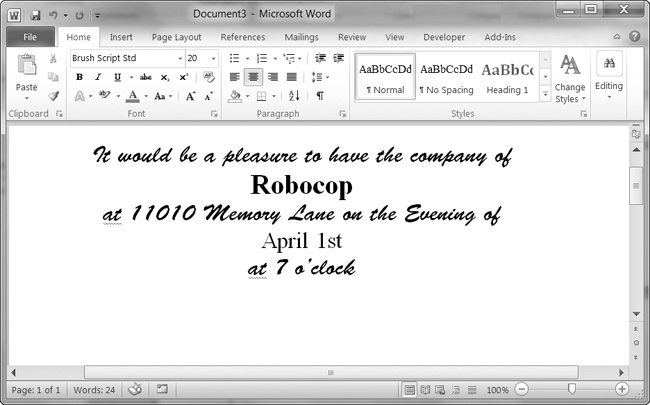
Figure xiii-11. The Word document generated by your custom invite script
You tin download a sample guests.txt file from http://nostarch.com/automatestuff/ .
Brute-Force PDF Password Billow
Say you have an encrypted PDF that you take forgotten the password to, but you remember it was a single English give-and-take. Trying to guess your forgotten password is quite a slow task. Instead yous can write a program that will decrypt the PDF by trying every possible English word until it finds one that works. This is called a beast-strength password attack. Download the text file lexicon.txt from http://nostarch.com/automatestuff/ . This dictionary file contains over 44,000 English language words with one word per line.
Using the file-reading skills you learned in Affiliate 8, create a listing of word strings by reading this file. Then loop over each word in this list, passing it to the decrypt() method. If this method returns the integer 0, the password was wrong and your program should proceed to the next countersign. If decrypt() returns 1, then your program should break out of the loop and print the hacked password. Yous should try both the uppercase and lower-case form of each word. (On my laptop, going through all 88,000 capital letter and lowercase words from the dictionary file takes a couple of minutes. This is why you shouldn't use a simple English language word for your passwords.)
Source: https://automatetheboringstuff.com/chapter13/
0 Response to "The Original Document Was Reused. Read It Again From File"
Postar um comentário